How to record and edit your screen in AVE.
Record a screen, window, or area with camera and audio, choose a background and frame, then refine zooms, cursor, privacy masks, and audio on the timeline.
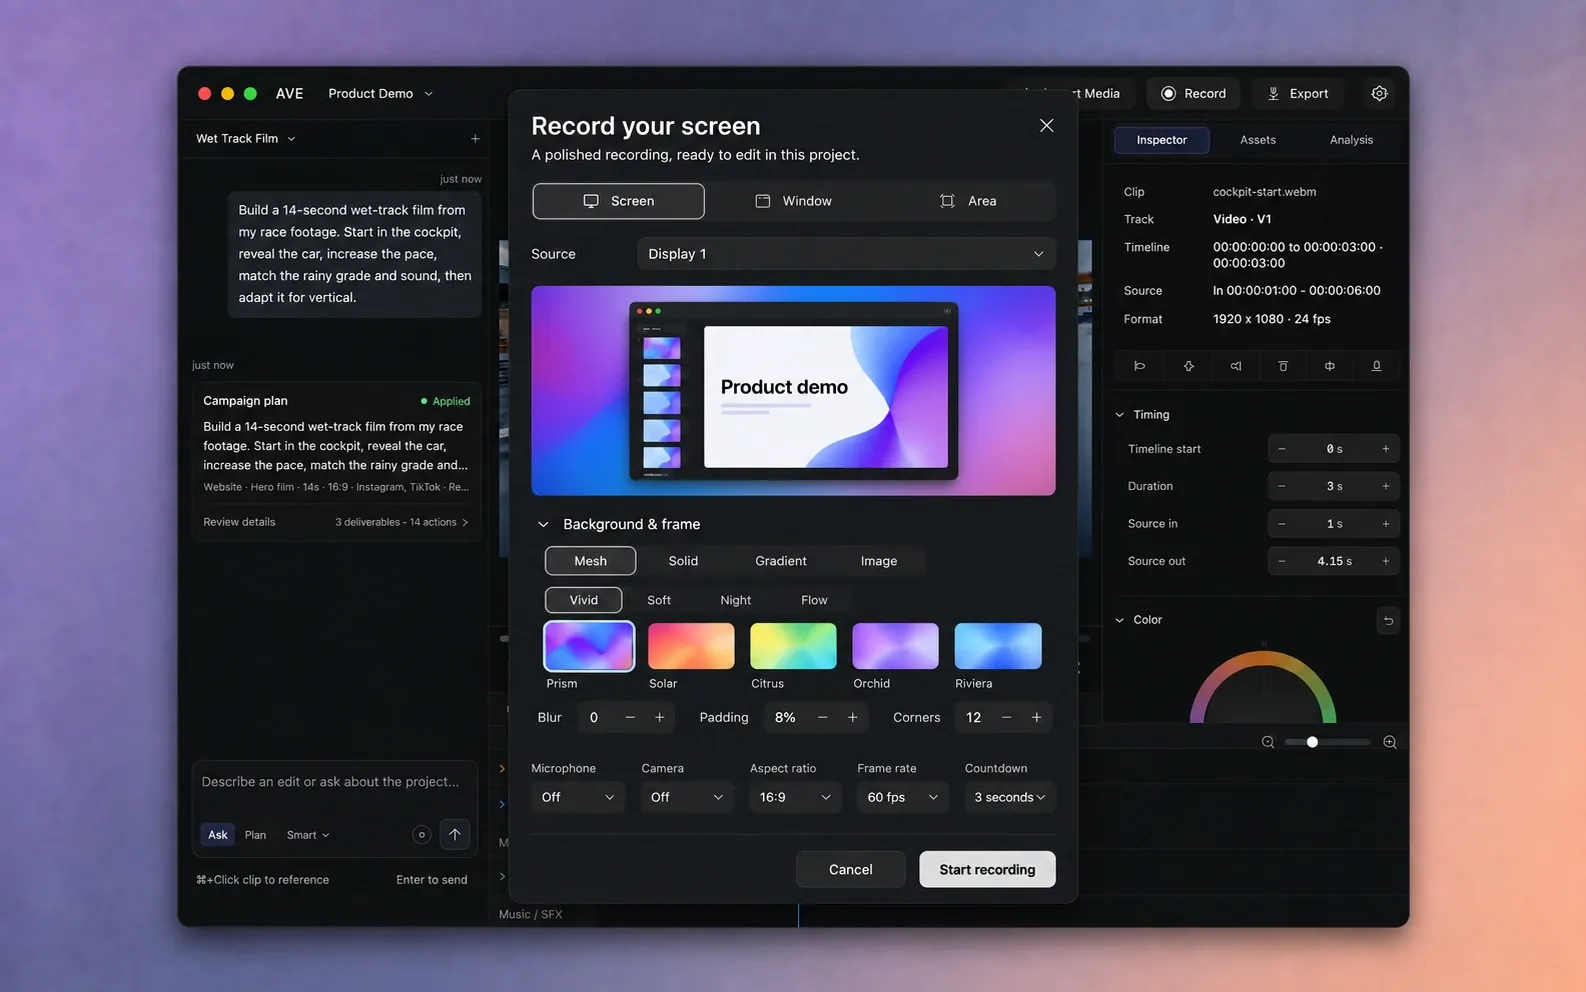
Prepare your Mac and project.
Install AVE 1.2.9 on an Apple silicon Mac running macOS 15 or later. Screen recording is included in AVE Free, with no separate recorder download or account. AVE itself continues to support macOS 14 for editing, importing, and exporting.
Open a saved project and choose the sequence that should receive the take. Choose Record in the editor header, or start from Record on Home. If you do not have a project, create one when prompted.
Allow the inputs you want to record.
- Choose Allow screen recording if AVE asks for screen access.
- In macOS System Settings → Privacy & Security → Screen & System Audio Recording, enable AVE.
- If macOS asks you to quit and reopen, do that, then choose Record again. Use Check permissions to refresh the status.
- Allow microphone or camera access when you enable those inputs. You can leave either input Off.
Permission names can vary with macOS. These are permissions for AVE, the app installed in Applications. Close any sensitive windows before choosing a whole-screen recording.
Choose what appears in the take.
- Screen: choose the display to capture, including switching between apps.
- Window: choose a specific window from the source menu. It stays the selected source when another app comes to the front.
- Area: choose the display and select the region you want to capture.
Check the live preview before you start. The source determines what is captured; the aspect ratio determines how the recording is framed. A 16:9 frame does not change a tall window into a wide one.
Make the background and frame yours.
Background & frame appears first below the preview and starts open. A new recording starts with a Mesh background and a 16:9 frame.
- Choose one of 20 original backgrounds in Vivid, Soft, Night, or Flow.
- Or switch to Solid, Gradient, or Image. Image accepts your own PNG or JPEG background and saves a copy with the recording.
- Adjust Padding, Corners, background Blur, and Shadow. Padding is the deliberate space around the captured content.
These choices remain editable after recording. You can try a different background or framing in Inspector without capturing another take.
Set camera, audio, and output before starting.
- Microphone: choose an input or Off. Speak briefly and check the level meter.
- Camera: choose an input or Off. Move the overlay to any corner, change its size and mirroring, and choose Squircle, Wide, Circle, or Square.
- System audio: enable it to capture audio from your Mac.
- Aspect ratio: choose 16:9 · Landscape, 9:16 · Portrait, Square, or Source.
- Frame rate: choose 30 or 60 fps.
- Countdown: choose Off, 3, 5, or 10 seconds.
Set cursor visibility, style, size, smooth movement, idle hiding, and click effects in Cursor. Enable or disable Automatic zooms and choose the zoom amount. You can edit individual zooms after capture.
Use Hide desktop icons or Hide Dock when you want a cleaner display. These preferences are restored when the recording finishes.
Record, pause, and save the take.
- Choose Start recording and wait for the countdown you selected.
- Switch to the app you want to demonstrate. The floating recording bar shows elapsed time.
- Choose Pause and resume as needed. Choose Stop to save the take.
The restart arrow discards the current take and starts again; the × discards it. Use Stop when you want to keep your work. Recording automatically stops at two hours.
After saving, AVE imports the recording into Assets, places it on the active sequence, and selects and reveals the clip. Your captured media and editable recording metadata stay in the project folder.
Refine the clip instead of recording again.
Select the recording clip and open Inspector. Background and recording frame controls start expanded. Adjust camera, cursor, zooms, privacy masks, audio, and crop in their sections.
- Zoom timing: expand an automatic or manual zoom to change its In and Out times, zoom amount, and focus. Remove an unwanted zoom with its remove control. Use Add zoom for a deliberate new zoom.
- Effect lanes: choose Edit timing to show Zooms, Masks, and Camera lanes above the normal video tracks. Adjust effect ranges there or through Inspector.
- Privacy: use Add mask, then set its timing and bounds over the sensitive area. Watch the complete affected range before export.
- Camera and audio: refine the overlay or add timed camera layouts, then mix microphone and system audio separately.
Effects follow source time through trims, splits, and speed changes. To split the selected clip at the playhead, use ⌘B. Timeline shortcuts pause while you work in fields, dropdowns, and modals; ⌘\ toggles the sidebar.
Export a finished video or a short GIF.
Play the sequence and check framing, zooms, masks, and audio. Choose Export for the normal local video workflow, including other timeline clips and edits.
For a recording clip of 60 seconds or less, open its recording actions in Inspector and choose Export recording clip as GIF. The GIF is saved in Project Exports. GIF has no audio; use a video format when sound matters.
Check these before trying another take.
AVE is missing from recording permissions, or access still looks blocked
Use Allow screen recording in AVE first. Enable the installed AVE app in System Settings, fully quit and reopen it if access was already enabled, and check permissions again. Development and QA apps can have separate permission entries.
The window menu shows the wrong source
Choose Window, open the source menu, and select the window you intend to demonstrate. Use Screen when your demonstration needs several windows or apps.
I cannot find the completed clip
Wait for saving to finish, then inspect Assets and the active sequence. AVE normally selects and scrolls to the new clip. Keep the project open and report any save error instead of deleting its recording folder.
I want less space around the screen
Select the clip, reduce Recording frame Padding, and check both the recording aspect and sequence canvas. A source window and output canvas can have different proportions.
For a repeatable problem, send your AVE version, macOS version, selected source and inputs, and the exact error to support@tinythings.app. See the file management guide before moving or deleting recorded media.